
Documentation
Your Guide to Using SLATE

Camera Track
Overview
The Camera Track is where you create all your cutscene Camera Shots and is responsible for rendering the cutscene. There can only ever be one Camera Track in a cutscene and is always under the Director Group. A Camera Track is added automatically to every new cutscene, but if you do not need any camera shots for your cutscene you are free to delete it of course.
As soon as the Camera Track becomes active, the Director Render Camera becomes active as well, setting itself as the main camera through which the cutscene rendering takes place.
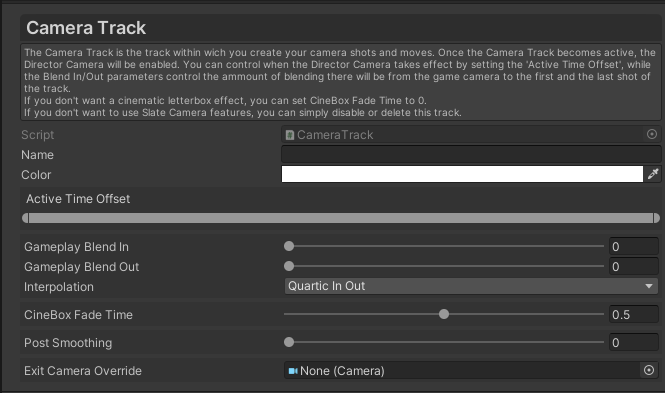
Following is an explanation of the Camera Track inspector parameters:
- Active Time Offset. Using this min-max slider, you can control when the Camera Track becomes active within the cutscene length.
- Gameplay Blend In. Is used to enable blending in from the gameplay camera (Camera.main) to the first camera shot of the track.
- Gameplay Blend Out. Is used to enable blending out to the gameplay camera (Camera.main) from the last camera shot of the track.
- Interpolation. The interpolation used for the gameplay blend in and out.
- CineBox Fade Time. Is the time it takes for the cinematic letterbox to fade in and out. If you don’t want a letterbox you can simply set this to zero.
- Post Smoothing. An optional smoothing added on top of all camera shots.
- Exit Camera Override. An optional camera you want to become active (or blend out to) by the end of the cutscene. You only need to set this if you want a camera other than the game camera (which is the default already).
Camera Shots

The Camera Track works closely with the Camera Shot clips which is the only type of clip that can be added to the Camera Track. Camera Shots are the eyes of the cutscene and in Slate a lot has been put into making the process of blocking and staging a cutscene as intuitive as possible. Shots within the scene are easily recognizable by their special gizmos and their motion path if any can also be viewed and edited within the scene view for the shot clip currently selected in the Slate editor.

Shot Creation
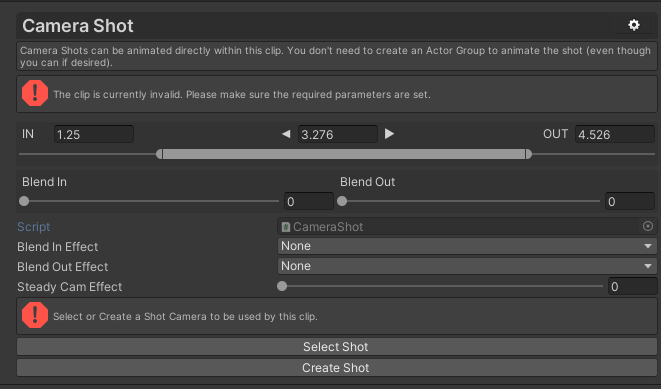
Once you place a Camera Shot clip within the Camera track, it’s possible to either create a new shot or select an existing shot through the Shot Picker, which gives you a convenient preview of all the shots available in the scene. If you chose to create a new shot, it is helpful to remember that the new shot will be created at the same position and rotation as your current scene view camera, which is convenient if you already have a frame of what you want to shoot.
 – Shot Picker –
Shot Control
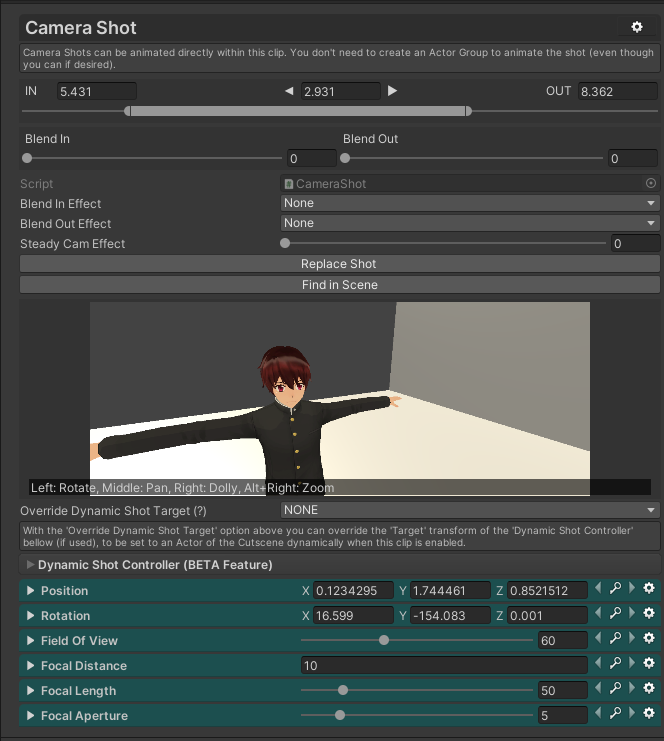
In Slate it is easy to create moving camera shots since the parameters of the clip are animatable parameters. As such, a camera shot clip can be keyframed to perform a specific “move” within its length. The animatable parameters include the shot’s Position, Rotation, and Field of View, as well as the Focal Distance, Length, and Aperture (which are related to Depth of Field image effects only).
While controlling the shot camera can be done through the scene view as normal (you can double-click the clip to quickly select the shot camera), it can also be controlled through the camera shot clip inspector directly.

Another way to control the shot is with the “Look Through Camera” button in the scene view as well. Remember that as usual with all clips that contain animatable parameters (like the Camera Shot clip does), it has a DopeSheet, you can fold out the parameters, and you can edit their curves if they have any keyframes.
Shots can also be dynamically animated using the Dynamic Shot Controller. Please read about the Dynamic Shot Controller here since it deserves its own section.
Transitions
Shot clips have an optional Blend In Effect and Blend Out Effect, which in practice are used for controlling the transition effects from one shot to the next if an effect is desired. The options for Blend In Effect are:
- None, which simply means that it is a clean cut.
- Fade In, will fade into the shot from black. This is particularly useful if the previous shot has a Fade Out effect as well.
- Cross Dissolve, will cross-dissolve the previous shot into this shot.
- Ease In, will smoothly transition from the previous shot into this shot.
The options for the Blend Out Effect are currently one, that being Fade Out, which works closely with the next shot’s Fade In.

Steady Cam Effect
Last but not least, there is a SteadyCam effect slider that can be used to apply a noise (something that is typically introduced from a steady-cam rig).
 The effect applied at 0.5 out of 1, on an otherwise non-animated shot.